

사실 되게 고민이었던 게...
로그인을 완료하고 인덱스 페이지로 이동시킨 후 인덱스 페이지 디자인을 어떻게 해야할 지 굉장히 고민이었다.
내가 디자인 쪽을 잘 아는 것도 아니니... 인덱스를 어떻게 꾸며야 할 지 굉장히 고민이었다.
그런데 "디자이너가 지고 개발자가 이긴 제품은 항상 성능이 좋다"라는 말이 있지 않나??
예를 들면 동성 클리너 같은 거... 진짜 겉보기에는 뭔 70년대 물티슈같이 생겼는데 막상 써보니까 성능이 되게 좋았음 ㅋㅋ
여튼 그래서 그냥 인덱스 페이지에는 별 거 안 넣었다.
지하철 탑승 버튼이랑 로그아웃 단 두 개... ㅋㅋㅋㅋ

이게 인덱스 화면인데, 로그아웃은 그냥 말 그대로 로그아웃이다.
도착 알리미 설정 버튼을 누르면 다음 단계로 향한다!

Step 1에서는 탑승할 지하철 노선을 선택한다.
되게 큼직큼직하게 만든 이유가... 아무래도 모바일으로 많이들 사용하실 테니 모바일 환경에서 사용 편리하게 UI를 그냥 큼직큼직하게 만들었다.
여튼 해당 단계에서 탑승할 노선을 클릭하면 다음 단계로 이동한다.
다음 단계에서는 현재 위치해 있는 역을 선택할 차례인데...
사용자가 지하철을 타기 전인지, 타고 있는 중인지 알 수 없으므로 두 가지를 모두 고려해야 한다.
이 두 경우를 모두 고려할 수 있는 방안을 생각해 봤는데,
- 지하철을 탑승하기 전: 지하철을 탑승할 역을 선택한다.
- 지하철을 탑승한 후: 현재 내가 타고 있는 지하철의 다음 도착역을 선택한다.
물론 지하철 탑승 중인 경우에는 다음 도착역을 알아야 한다는 단점이 있지만... 보완할 만한 아이디어가 없다 ㅜ
그래서 일단, 역을 선택해야 하므로 station Model을 만들어 DB에 테이블을 만들어 주었다.
< Station.java >

@Builder
@NoArgsConstructor
@AllArgsConstructor
@Data
@Entity
public class Station {

    @Id
    @GeneratedValue(strategy = GenerationType.IDENTITY)
    private int id;

    private int SUBWAY_ID;

    private String 호선이름;

    private String STATN_ID;

    private String STATN_NM;
}
그리고 아래 경로의 역 정보 데이터를 모두 sql으로 변환하여 DB에 역 정보를 모두 등록해 주었다.
https://data.seoul.go.kr/dataList/OA-12764/F/1/datasetView.do
이제 역을 선택할 준비는 끝났다.
Step 2에서는, 역 이름의 일부를 입력하고 검색하면, 역 객체가 HTML에 나타나고 그걸 선택하면 된다.

<div id="step2Contents" class="stepContents" style="display: flex">
    <div class="stepSpan">
        <span style="margin-bottom: 10px; font-size: 16px"><1호선></span>
        <span style="margin-bottom: 20px">Step 2. 현재 위치를 선택해 주세요.</span>
        <span style="font-size: 20px">지하철을 탑승하지 않았을 경우: 지하철을 탑승할 역</span>
        <span style="font-size: 20px">지하철을 탑승하고 있는 경우: 탑승 중인 지하철의 다음 정차 역</span>
    </div>

    <div class="inputContainer">
        <input class="inputStn" placeholder="역 이름 검색..." oninput="searchFrom(this.value)">
    </div>

    <div id="stationContainer" style="width: 80%">

    </div>
</div>
///////////////////////////////////////////////////////////////
// Step 2
function searchFrom(stnName) {
const stationContainer = document.getElementById('stationContainer');
stationContainer.innerHTML = "";
let data = {
stnName: stnName,
subwayID: subwayID
}
$.ajax({
type: "POST",
url: "/findStation",
data: JSON.stringify(data),
contentType: "application/json; charset=utf-8"
}).done(function (resp) {
resp.forEach(function (station) {
const stationDiv = document.createElement('div');
stationDiv.className = 'stationButton';
stationDiv.innerText = station.stationName;
stationDiv.onclick = function () {
onClickStation(station);
};
stationContainer.appendChild(stationDiv);
});
}).fail(function (error) {
alert("에러 발생 (콘솔 확인)");
console.log(error);
});
}
function onClickStation(station) {
document.getElementById('step2Contents').style.display = 'none';
document.getElementById('step3Contents').style.display = 'flex';
fromStationID = station.stationId;
fromStationName = station.stationName;
findSubways(station.stationName)
}< HomeApiController.java >
@PostMapping("/findStation")
public ArrayList<Station> findStation(@RequestBody FindStationDTO findStationDto) {
ArrayList<Station> result = homeService.findStation(findStationDto);
return result;
}< HomeService.java >
@Transactional
public ArrayList<Station> findStation(FindStationDTO findStationDto) {
String stationName = findStationDto.getStnName();
int subwayId = findStationDto.getSubwayID();
ArrayList<Station> result = stationRepository.findAllByStationNameLikeAndSubwayId("%"+stationName+"%", subwayId);
if (result.size() == 0) { // 해당 이름을 포함하는 이름의 역이 없을 경우
return null;
} else {
return result;
}
}input에 글을 입력할 때마다 searchFrom 함수가 동작하게 만드려면, html input 태그의 oninput 설정을 사용하면 된다!
입력될 때마다 ajax를 수없이 보내겠지만... 뭐 차차 더 좋은 방법이 있으면 개선하면 되겠지...?
그리고 여기서 현재 위치하고 있는 역을 클릭하면, Step 4로 넘어간다.
Step 3에서는, 자신이 탑승하거나 탑승할 지하철을 고르는 단계이다.
Step 3에서 선택한 지하철이 목적지 역의 전역을 출발하면, 카카오톡으로 알림이 전송되는 것이다!
즉, 내가 선택한 역에 들어오고 있는 역의 목록을 불러와서 그 중 하나를 선택하면 되는 것...
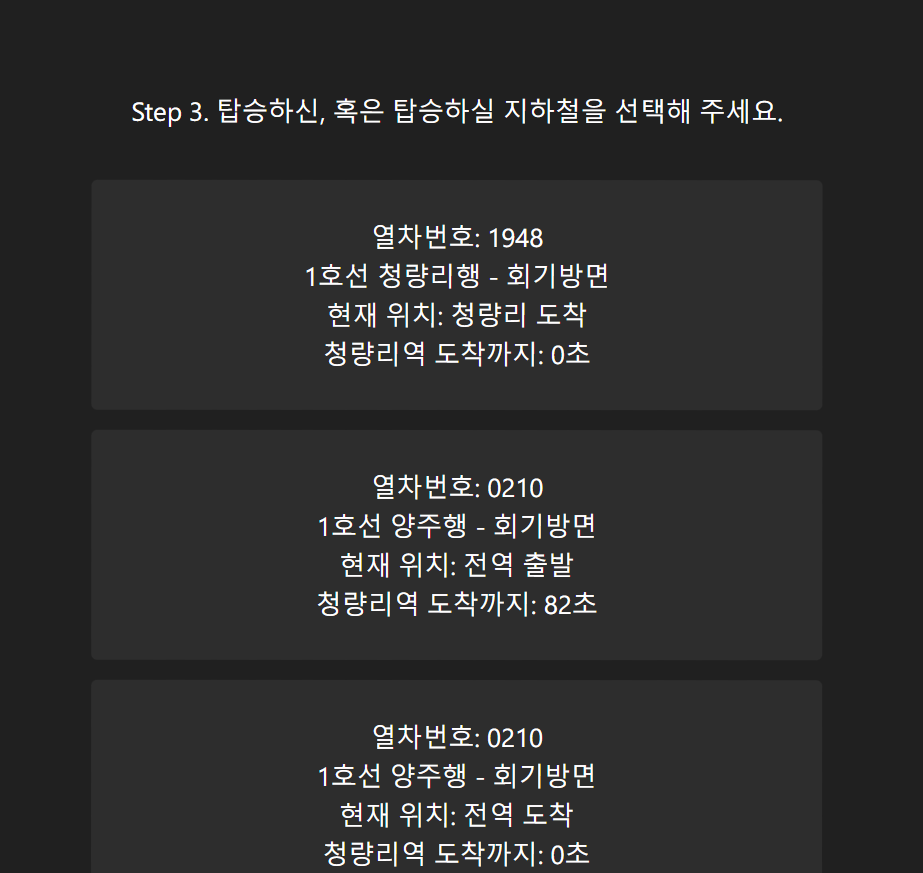
여기서 서울시에서 제공하는 공개 API를 사용하게 된다.
실시간 지하철 도착 정보를 제공받아야 하기 때문!!
열차 번호와 노선(어디 행인지), 현재 위치와 선택한 역 도착까지 몇 초 남았는지 등등을 해당 API에서 모두 제공해주기 때문에 나는 그냥 프론트만 이쁘게(?) 꾸미면 됐다.
그런데 도착까지 0초는 뭐냐고..? 나도 모르겠다 ㅋㅋ 확인해보고 싶은데 현재 서울시 데이터 광장 홈페이지가 점검 중이라 확인을 못 해본다 ㅜㅜ
지금 당장은 해결할 수 없으니 차차 시간을 가지고 수정해야지...
아래는 Step 3에서 사용한 코드들이다.
<div id="step3Contents" class="stepContents">
    <div class="stepSpan">
        <span>Step 3. 탑승하신, 혹은 탑승하실 지하철을 선택해 주세요.</span>
    </div>

    <div id="subwayContainer" style="width: 80%">

    </div>
</div>
///////////////////////////////////////////////////////////////
// Step 3
function findSubways(stationName) {
data = {
stationName: stationName,
subwayID: subwayID
}
$.ajax({
type: "GET",
url: "/findSubway",
data: data,
contentType: "application/json; charset=utf-8"
}).done(function (resp) {
var subways = JSON.parse(resp).realtimeArrivalList;
for (let i=0; i<subways.length; i++) {
if(subways[i].subwayId === "1001") {
const subwayDiv = document.createElement("div");
subwayDiv.className = "subwayButton";
const subwayName = document.createElement("span");
subwayName.innerText = "열차번호: " + subways[i].btrainNo;
const subwayTo = document.createElement("span");
subwayTo.innerText = "1호선 " + subways[i].trainLineNm;
const subwayNow = document.createElement("span");
subwayNow.innerText = "현재 위치: " + subways[i].arvlMsg2;
const subwayTime = document.createElement("span");
subwayTime.innerText = stationName + "역 도착까지: " + subways[i].barvlDt + "초";
subwayDiv.appendChild(subwayName);
subwayDiv.appendChild(subwayTo);
subwayDiv.appendChild(subwayNow);
subwayDiv.appendChild(subwayTime);
subwayDiv.onclick = function () {
onClickSubway(subways[i].btrainNo);
}
document.getElementById('subwayContainer').appendChild(subwayDiv);
}
}
}).fail(function (error) {
alert("에러 발생 (콘솔 확인)");
console.log(error);
});
}
function onClickSubway(btrainNo) {
document.getElementById('step3Contents').style.display = 'none';
document.getElementById('step4Contents').style.display = 'flex';
subwayNo = btrainNo;
}< HomeApiController.java >
@GetMapping("/findSubway")
public String findSubway(@RequestParam String stationName, int subwayID) {
String result = homeService.findSubway(stationName, subwayID);
return result;
}@Transactional
public String findSubway(String stationName, int subwayId) {
RestTemplate rt = new RestTemplate();
MultiValueMap<String, String> params = new LinkedMultiValueMap<>();
HttpEntity<MultiValueMap<String, String>> Request = new HttpEntity<>(params);
String url = "http://swopenAPI.seoul.go.kr/api/subway/" + HiddenData.subwayKey + "/json/realtimeStationArrival/0/10/" + stationName;
ResponseEntity<String> response = rt.exchange(
url, // https://{요청할 서버 주소}
HttpMethod.GET, // 요청할 방식
Request, // 요청할 때 보낼 데이터
String.class // 요청 시 반환되는 데이터 타입
);
return response.getBody();
}
여튼 여기까지 하면... Step 3까지 완료함으로써 내가 탑승할 지하철을 선택하는 단계까지 마무리된다.
이제 내가 선택한 지하철 정보를 Step 4로 넘겨서 목적지 역을 선택한 후 알림을 전송하는 등의 로직을 작성하면 될 듯...?
'프로젝트 > SUFY' 카테고리의 다른 글
| [도착 알리미 SUFY] 6. 일정 시각마다 특정 작업 수행 로직 구현하기 (1) | 2024.02.16 |
|---|---|
| [도착 알리미 SUFY] 5. 알림 정보를 DB에 등록하기 (1) | 2024.02.15 |
| [도착 알리미 SUFY] 3. 카카오 로그인 구현 및 jwt토큰 (2) (1) | 2024.02.06 |
| [도착 알리미 SUFY] 2. 카카오 로그인 구현 및 jwt토큰 (1) (7) | 2024.02.06 |
| [도착 알리미 SUFY] 1. 지하철 도착 알리미 웹 개발 준비 (0) | 2024.02.05 |


