
지금까지 가입된 유저를 찾는 기능이 없었어서 계속 주소 창에서 주소를 입력해서 들어갔었는데 너무 불편해서(...)
이제서야 유저 검색 기능을 만들기로 했다.
사실 검색 자체는 굉장히 간단한 기능인 것 같아서... 빠르게 구현할 수 있을 듯?!
일단 간단히 유저 검색 폼을 만들어 주었다.
실제 인스타그램은 검색을 클릭하지 않아도 파바박 유저들이 나오던데... 프론트는 아직 문외한이라 거기까지는 일단 스킵 ㅜ
(사실 할 수는 있을 것 같은데 귀찮은 게 너무 크다)
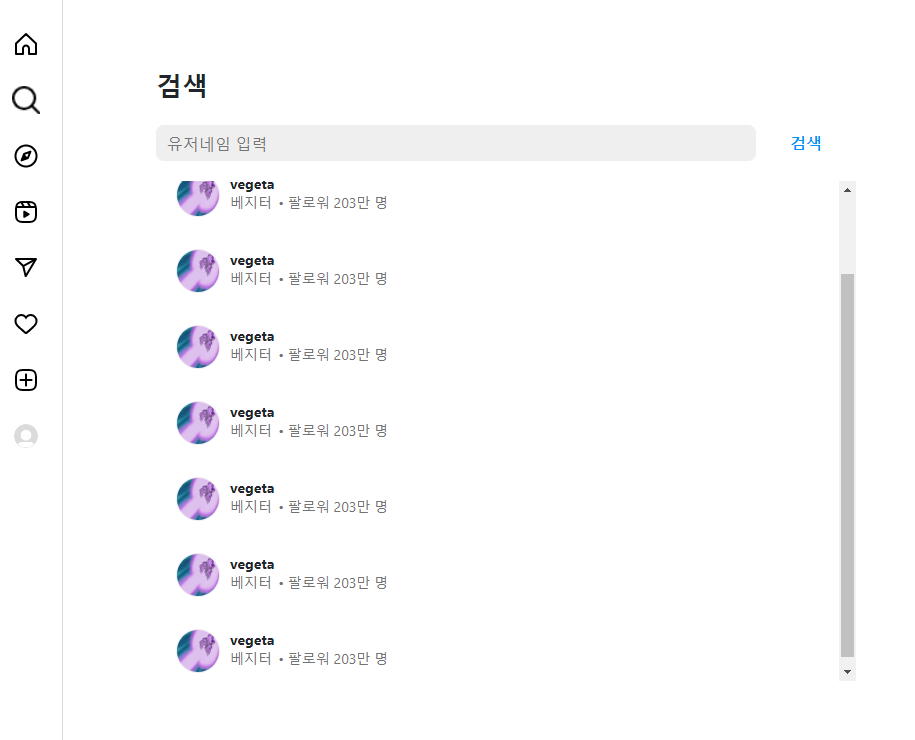
뭐 이런 식으로 나오게... 만들었다.
아직 검색을 구현한 건 아니고, 대략 div만 넣어서 어떤 식으로 나올지 형태만 잡아주었다.
닉네임을 검색하면 아래에 저렇게 유저 목록이 쫘르륵 나타나게 하면 될 것!
<%@ page language="java" contentType="text/html; charset=UTF-8" pageEncoding="UTF-8"%>

<head>
    <%@ include file="../../layout/indexHeader.jsp"%>
    <%@ include file="../../layout/menu.jsp"%>
    <%@ include file="../getPrincipal.jsp"%>

    <style>
        body {
            margin-left: 74px;
        }

        #Contents {
            position: relative;
            display: flex;
            justify-content: center;
        }

        #findDiv {
            position: absolute;
            top: 130px;
            width: 700px;
        }

        #findButton {
            width: 80px;
            margin-left: 10px;
            margin-right: 10px;
            color: #0095f6;
            cursor: pointer;
            font-weight: bold;
        }
        #findButton:hover {
            font-size: 17px;
            color: #1877f2;
        }
        #findButton:active {
            font-size: 16px;
            color: #4cb5f9;
        }

        #users {
            width: 700px;
            padding: 16px 20px;
            cursor: pointer;
            border-radius: 6px;
        }
        #users:hover {
            background-color: #f2f2f2;
        }
        #users:active {
            background-color: #fafafa;
        }

        #users_profileImg {
            width: 44px;
            height: 44px;
            border: 1px solid #ededed;
            border-radius: 50%;
            margin-right: 10px;
        }
    </style>
</head>

<body>
    <div id="Contents">
        <div id="findDiv">
            <div style="margin-right: auto; padding: 20px 0px">
                <span style="font-size: 26px; font-weight: bold">검색</span>
            </div>
            <div style="display: flex; flex-direction: row; margin-bottom: 20px">
                <input id="findInput" style="width: 600px; height: 36px; border: none; border-radius: 8px; background-color: #efefef" placeholder="  유저네임 입력">
                <div id="findButton" style="width: 80px; margin-left: 10px; margin-right: 10px; display: flex;  align-items: center; justify-content: center" onclick="findUsers()">검색</div>
            </div>

            <div id="usersDiv" style="height:500px; overflow-y: auto; overflow-x: hidden">

            </div>
        </div>
    </div>
</body>

<script src="/js/find.js"></script>
그리고 예전 포스트부터 베지터가 왜이렇게 많이 나오냐고 묻는다면...
테스트 계정 만드려고 프로필 사진을 검색하고 구하고 있었는데, 구글에 캐릭터 사진 검색하니 제일 먼저 발견한 게 저 베지터 사진이라서... 그냥 저걸 계속 쓰고 있다... ㅋㅋㅋㅋㅋㅋㅋㅋㅋㅋㅋㅋㅋ
여튼 저 div를 반복해서 띄우면 될 것이다.
그러면 유저이름을 입력해서 검색하는 js 함수를 아래와 같이 구현하였다.
function findUsers () {
    var usernameInput = document.getElementById('findInput').value;
    if (usernameInput === "") {
        alert("유저네임을 입력해주세요.");
    } else {
        let data = {
           username: usernameInput
        }
        $.ajax({
            type: "GET",
            url: "/findUser",
            data: data,
            contentType: "application/json; charset=utf-8",
        }).done(function(accounts) {

            var usersDiv = document.getElementById('usersDiv');
            usersDiv.innerHTML = "";

            accounts.forEach(function(account) {

                const users = document.createElement("div");
                users.id = "users";
                users.onclick = function () {
                    gotoProfile(account.username);
                }

                    const users_contents = document.createElement("div");
                    users_contents.id = "users_contents";
                    users_contents.style.display = "flex";
                    users_contents.style.flexDirection = "row";

                        const users_profileImg = document.createElement("img");
                        users_profileImg.id = "users_profileImg";
                        if (account.use_profile_img === 1) {
                            users_profileImg.src = "/dynamicImage/profile/" + account.username + "/profile.jpg";
                        } else {
                            users_profileImg.src = "/dynamicImage/profile/default.jpg";
                        }
                        users_contents.appendChild(users_profileImg);

                        const users_namesInfo = document.createElement("div");
                        users_namesInfo.id = "users_namesInfo";
                        users_namesInfo.style.display = "flex";
                        users_namesInfo.style.flexDirection = "column";

                            const users_username = document.createElement("span");
                            users_username.id = "users_username";
                            users_username.style.fontSize = "14px";
                            users_username.style.fontWeight = "bold";
                            users_username.style.marginBottom = "-2px";
                            users_username.innerText = account.username;
                            users_namesInfo.appendChild(users_username);

                            const users_name = document.createElement("span");
                            users_name.id = "users_name";
                            users_name.style.fontSize = "14px";
                            users_name.style.color = "#737373";
                            users_name.innerText = account.name;
                            users_namesInfo.appendChild(users_name);

                        users_contents.appendChild(users_namesInfo);

                        const users_followers = document.createElement('div');
                        users_followers.id = "users_followers";
                        users_followers.style.fontSize = "14px";
                        users_followers.style.color = "#737373";
                        users_followers.style.paddingTop = "19px";
                        users_followers.style.marginLeft = "4px";
                        users_followers.innerText = "• 팔로워 " + account.follower + "명";
                        users_contents.appendChild(users_followers);

                    users.appendChild(users_contents);

                usersDiv.appendChild(users);
            });
        }).fail(function (error) {
            alert("에러 발생 (콘솔 확인)");
            console.log(error);
        });
    }
}
그리고 이제 "/findUser"의 GET 컨트롤러를 만들어 줘야겠조???
이 컨트롤러는 username의 일부를 받아서, 그걸 포함하는 모든 유저들을 ArrayList로 반환하면 된다.
즉 JPA로 LIKE와 와일드카드 %를 사용해야 하는데, 이 기능 역시 JPA에서는 제공해주고 있다!
@GetMapping("/findUser")
public ArrayList<Account> find(@RequestParam String username) {
    ArrayList<Account> result = homeService.find(username);

    return result;
}
@Transactional
public ArrayList<Account> find(String username) {
ArrayList<Account> accounts = accountRepository.findAllByUsernameLike("%" + username + "%");
return accounts;
}그냥 JPA 구문 뒤에 'Like'를 붙여주면, 와일드카드와 LIKE 연산을 사용할 수 있다는 점!
이렇게 로직을 작성해 준다면, 이제 유저 검색은 모두 끝난다.
username의 일부를 데이터로 담아서 GET 요청을 보낸 후,
서버에서는 그 데이터를 받아서 JPA 쿼리 처리 후 해당하는 Account 객체들을 ArrayList로 담아 클라이언트에게 응답한다.
그리고 클라이언트 측에서 해당 응답 데이터를 보여주게 된다!
'프로젝트 > Kimstagram' 카테고리의 다른 글
| [내멋대로 만드는 Kimstagram] 13. 웹 소켓(Websocket)을 활용한 DM 구현 (1) | 2024.02.04 |
|---|---|
| [내멋대로 만드는 Kimstagram] 12. OAuth2를 활용한 페이스북 로그인 (0) | 2024.01.29 |
| [내멋대로 만드는 Kimstagram] 10. Jwt Refresh Token 발급하기 (1) | 2024.01.28 |
| [내멋대로 만드는 Kimstagram] 9. 팔로우 기능 구현하기 (1) | 2024.01.24 |
| [내멋대로 만드는 Kimstagram] 8. 프로필 수정 (0) | 2024.01.21 |


